fbpx

Self-Exclusion Plugin + 3 Months Support

£50.00 Per Ticket

Share On:

# Competition Website – Self-Exclusion Plugin

**Version:** 1.2
**Author:** Pete Leese
**Author URI:** [https://www.competitionarcade.com](https://www.competitionarcade.com)

## Description

The Self-Exclusion Plugin allows users to disable their ability to log in for a specified period, helping them take a break from the website if needed. This feature is particularly useful for websites dealing with competitions or other potentially addictive content.

## Features

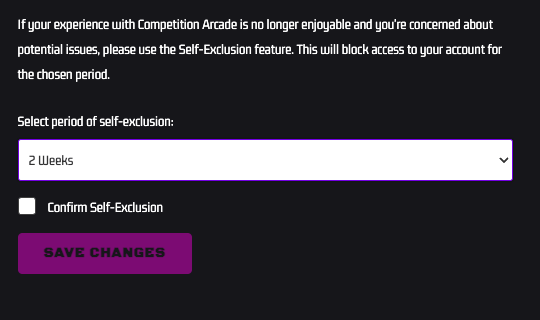
– **Self-Exclusion Page:** Adds a “Self-Exclusion” endpoint to the “My Account” page where users can initiate self-exclusion.
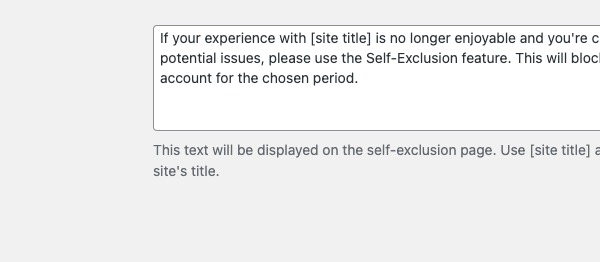
– **Customizable Text:** Admins can customize the text displayed on the self-exclusion page using placeholders for dynamic site titles.
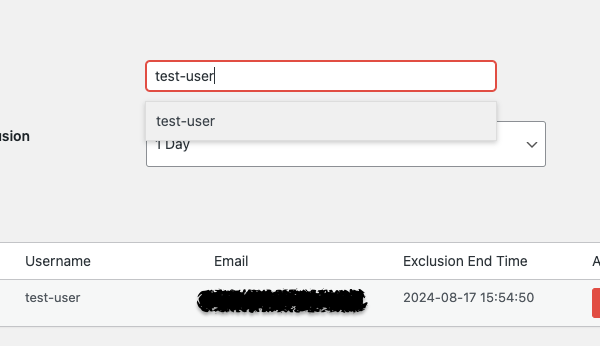
– **Admin Management:** Provides an admin interface for managing self-exclusions, including manually adding exclusions for users.
– **AJAX User Search:** Allows admins to search for users dynamically when adding exclusions manually.
– **Scheduled Re-Enabling:** A cron job runs hourly to check and re-enable accounts if their exclusion period has ended.

## Installation

1. Upload the plugin files to the `/wp-content/plugins/self-exclusion` directory, or install the plugin through the WordPress plugins screen directly.
2. Activate the plugin through the ‘Plugins’ screen in WordPress.
3. Use the Settings -> Self-Exclusion screen to configure the plugin.

## Usage

### Self-Exclusion for Users

1. Navigate to the “My Account” page.
2. Click on the “Self-Exclusion” link in the account menu.
3. Select the desired period of self-exclusion from the dropdown.
4. Confirm the self-exclusion by checking the checkbox and clicking “Save Changes”.

### Admin Management

1. Navigate to the WordPress Admin dashboard.
2. Click on “Self-Exclusion” in the admin menu.
3. Use the “Manage Exclusions” submenu to view and manage current self-exclusions.
4. Add new exclusions by typing a username in the provided input box. A list of matching users will appear as you type. Select a user and specify the exclusion duration.

## Screenshots

### Self-Exclusion Page for Users
![Self-Exclusion Page](path_to_screenshot.png)

### Admin Settings Page
![Admin Settings](path_to_screenshot.png)

### Manage Exclusions
![Manage Exclusions](path_to_screenshot.png)

## Changelog

### 1.2
– Added AJAX user search for admin manual exclusions.
– Improved UI for admin manual exclusions.
– Fixed escaping issues in customizable text.

### 1.1
– Added customizable text for the self-exclusion page.
– Improved admin management features.

### 1.0
– Initial release with basic self-exclusion functionality for users and admin management.

## Frequently Asked Questions

### How can I customize the self-exclusion text?

Navigate to the WordPress Admin dashboard and go to the “Self-Exclusion Settings” page. You can update the text there, using `[site title]` as a placeholder for the site’s title.

### Can I re-enable a user before their exclusion period ends?

Yes, admins can manually re-enable users from the “Manage Exclusions” page in the admin dashboard.

## Support

For support, please visit [https://www.competitionarcade.com](https://www.competitionarcade.com) or contact the author directly.


Category:

Description

# Competition Website – Self-Exclusion Plugin

**Version:** 1.2
**Author:** Pete Leese
**Author URI:** [https://www.competitionarcade.com](https://www.competitionarcade.com)

## Description

The Self-Exclusion Plugin allows users to disable their ability to log in for a specified period, helping them take a break from the website if needed. This feature is particularly useful for websites dealing with competitions or other potentially addictive content.

## Features

– **Self-Exclusion Page:** Adds a “Self-Exclusion” endpoint to the “My Account” page where users can initiate self-exclusion.
– **Customizable Text:** Admins can customize the text displayed on the self-exclusion page using placeholders for dynamic site titles.
– **Admin Management:** Provides an admin interface for managing self-exclusions, including manually adding exclusions for users.
– **AJAX User Search:** Allows admins to search for users dynamically when adding exclusions manually.
– **Scheduled Re-Enabling:** A cron job runs hourly to check and re-enable accounts if their exclusion period has ended.

## Installation

1. Upload the plugin files to the `/wp-content/plugins/self-exclusion` directory, or install the plugin through the WordPress plugins screen directly.
2. Activate the plugin through the ‘Plugins’ screen in WordPress.
3. Use the Settings -> Self-Exclusion screen to configure the plugin.

## Usage

### Self-Exclusion for Users

1. Navigate to the “My Account” page.
2. Click on the “Self-Exclusion” link in the account menu.
3. Select the desired period of self-exclusion from the dropdown.
4. Confirm the self-exclusion by checking the checkbox and clicking “Save Changes”.

### Admin Management

1. Navigate to the WordPress Admin dashboard.
2. Click on “Self-Exclusion” in the admin menu.
3. Use the “Manage Exclusions” submenu to view and manage current self-exclusions.
4. Add new exclusions by typing a username in the provided input box. A list of matching users will appear as you type. Select a user and specify the exclusion duration.

## Screenshots

### Self-Exclusion Page for Users
![Self-Exclusion Page](path_to_screenshot.png)

### Admin Settings Page
![Admin Settings](path_to_screenshot.png)

### Manage Exclusions
![Manage Exclusions](path_to_screenshot.png)

## Changelog

### 1.2
– Added AJAX user search for admin manual exclusions.
– Improved UI for admin manual exclusions.
– Fixed escaping issues in customizable text.

### 1.1
– Added customizable text for the self-exclusion page.
– Improved admin management features.

### 1.0
– Initial release with basic self-exclusion functionality for users and admin management.

## Frequently Asked Questions

### How can I customize the self-exclusion text?

Navigate to the WordPress Admin dashboard and go to the “Self-Exclusion Settings” page. You can update the text there, using `[site title]` as a placeholder for the site’s title.

### Can I re-enable a user before their exclusion period ends?

Yes, admins can manually re-enable users from the “Manage Exclusions” page in the admin dashboard.

## Support

For support, please visit [https://www.competitionarcade.com](https://www.competitionarcade.com) or contact the author directly.
 

Free Postal Entry Route

About This Competition

# Competition Website – Self-Exclusion Plugin

**Version:** 1.2
**Author:** Pete Leese
**Author URI:** [https://www.competitionarcade.com](https://www.competitionarcade.com)

## Description

The Self-Exclusion Plugin allows users to disable their ability to log in for a specified period, helping them take a break from the website if needed. This feature is particularly useful for websites dealing with competitions or other potentially addictive content.

## Features

– **Self-Exclusion Page:** Adds a “Self-Exclusion” endpoint to the “My Account” page where users can initiate self-exclusion.
– **Customizable Text:** Admins can customize the text displayed on the self-exclusion page using placeholders for dynamic site titles.
– **Admin Management:** Provides an admin interface for managing self-exclusions, including manually adding exclusions for users.
– **AJAX User Search:** Allows admins to search for users dynamically when adding exclusions manually.
– **Scheduled Re-Enabling:** A cron job runs hourly to check and re-enable accounts if their exclusion period has ended.

## Installation

1. Upload the plugin files to the `/wp-content/plugins/self-exclusion` directory, or install the plugin through the WordPress plugins screen directly.
2. Activate the plugin through the ‘Plugins’ screen in WordPress.
3. Use the Settings -> Self-Exclusion screen to configure the plugin.

## Usage

### Self-Exclusion for Users

1. Navigate to the “My Account” page.
2. Click on the “Self-Exclusion” link in the account menu.
3. Select the desired period of self-exclusion from the dropdown.
4. Confirm the self-exclusion by checking the checkbox and clicking “Save Changes”.

### Admin Management

1. Navigate to the WordPress Admin dashboard.
2. Click on “Self-Exclusion” in the admin menu.
3. Use the “Manage Exclusions” submenu to view and manage current self-exclusions.
4. Add new exclusions by typing a username in the provided input box. A list of matching users will appear as you type. Select a user and specify the exclusion duration.

## Screenshots

### Self-Exclusion Page for Users
![Self-Exclusion Page](path_to_screenshot.png)

### Admin Settings Page
![Admin Settings](path_to_screenshot.png)

### Manage Exclusions
![Manage Exclusions](path_to_screenshot.png)

## Changelog

### 1.2
– Added AJAX user search for admin manual exclusions.
– Improved UI for admin manual exclusions.
– Fixed escaping issues in customizable text.

### 1.1
– Added customizable text for the self-exclusion page.
– Improved admin management features.

### 1.0
– Initial release with basic self-exclusion functionality for users and admin management.

## Frequently Asked Questions

### How can I customize the self-exclusion text?

Navigate to the WordPress Admin dashboard and go to the “Self-Exclusion Settings” page. You can update the text there, using `[site title]` as a placeholder for the site’s title.

### Can I re-enable a user before their exclusion period ends?

Yes, admins can manually re-enable users from the “Manage Exclusions” page in the admin dashboard.

## Support

For support, please visit [https://www.competitionarcade.com](https://www.competitionarcade.com) or contact the author directly.
 

×

Check this out!

Share On: